Writing technical articles should be easy and I really shouldn't worry too much about formatting, so I decided to embrace Markdown full swing.
My new blog is hosted on Github Pages.
This Blog is closed. Archive only.
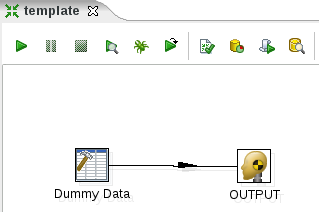
On some occasions you might have to set a variable value dynamically in a job so that you can pass it on to the Execute SQL Script job entry in example. In this blog post we will take a look at how to create an integer representation of the date of 30 days ago. And we want to achieve this without using an additional transformation!
The way to achieve this in a simple fashion on the job level is to use the Evaluate JavaScript job entry [Pentaho Wiki]. While this job entry is not really intended to do this, it currently offers the easiest way to accomplish just this. Just add this job entry to your Kettle job and paste the following JavaScript:
date = new java.util.Date();
date.setDate(date.getDate()-30); //Go back 30 full days
var date_tk_30_days_ago = new java.text.SimpleDateFormat("yyyyMMdd").format(date);
parent_job.setVariable("VAR_DATE_TK_30_DAYS_AGO", date_tk_30_days_ago);
true; // remember that this job entry has to return true or false
To test this let's add a Log job entry:

Add this to the log message to the job entry settings:
The date 30 days ago was: ${VAR_DATE_TK_30_DAYS_AGO}
And then run the job. You should see something similar to this:

Certainly you could just pass the value as parameter from the command line to the job, but on some occasions it is more convenient to create the value dynamically inside the job.
Software used:
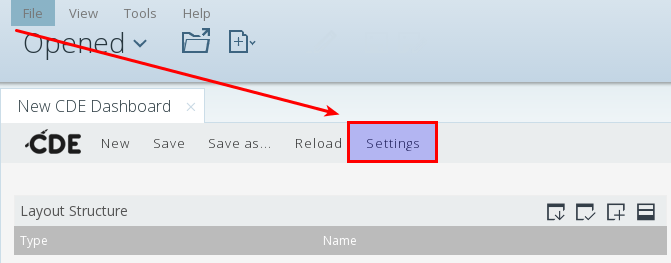
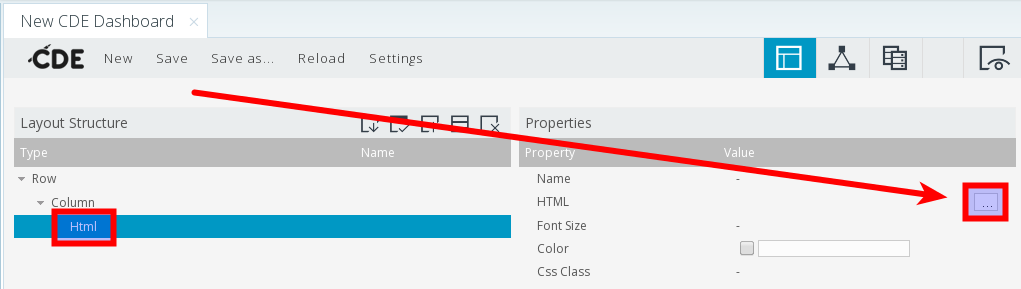
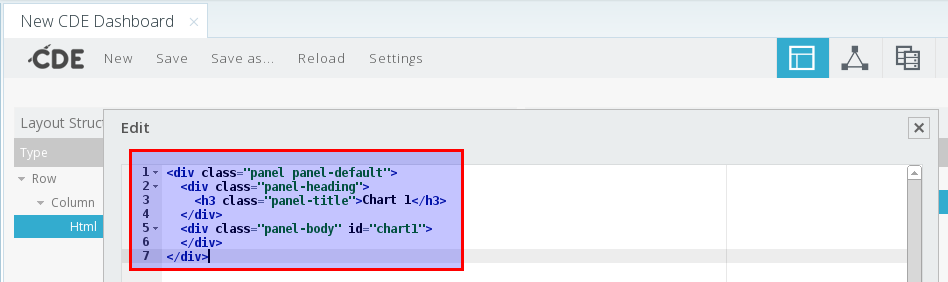
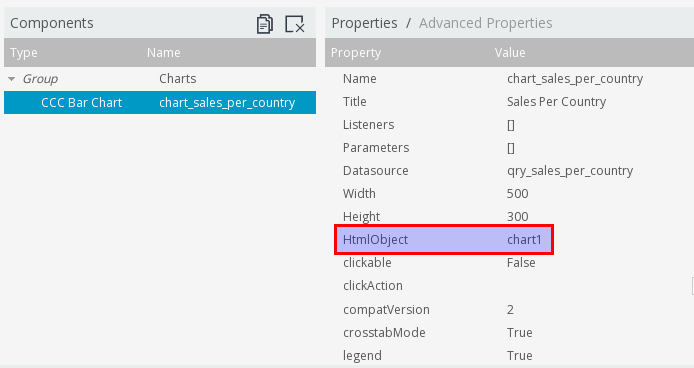
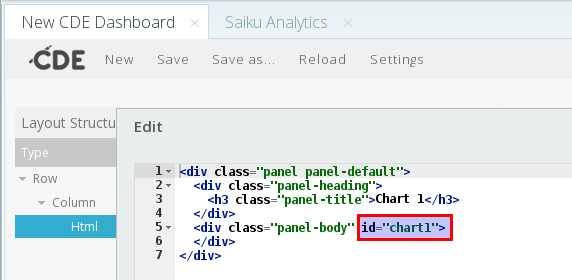
You want to implement something in your dashboard that is not covered by the out-of-the-box dashboard components? Luckily, with Pentaho CDE the world is open: CDE makes use of the standard web technologies (CSS, JavaScript, HTML), so theoretically you can implement whatever is in the realm of these technologies. Obviously you will need some basic knowledge of these technologies (setup is not as easy any more as filling out some config dialogs), but the possibilities are endless. In this post I’ll briefly talk you through how to source some data and then to create a custom table with it (which you can easily do with one of the CDE components as well, but that’s not the point here … imagine what else you could do):
In CDE, register a Datasource. In example create a sql over sqlJndi datasource, provide a Name i.e. qry_generic_select, choose SampleData for JNDI and specify following query:
SELECT customername, customernumber, phone FROM customers

Write a Post Execution function, in example:
 function() {
      document.getElementById('test').innerHTML = JSON.stringify(select_result);
 }
We will only use this function for now to test if the query is working. Later on we will change it.


Let’s change the Post Execution function to return only the first record:
function() {
     document.getElementById('test').innerHTML = JSON.stringify(select_result[0]);
}
And the preview looks like this: 
Let’s change the Post Execution function to return only the first entry from the first record:
function() {
     document.getElementById('test').innerHTML = JSON.stringify(select_result[0][0]);
}
And the preview looks like this:

Let’s extend our Post Execution function to create a basic table:
function() {
  var myContainer = document.getElementById('test');
  var myTable = document.createElement('table');
  var myTr = document.createElement('tr');
  var myTd = document.createElement('td');
myContainer.appendChild(myTable).appendChild(myTr).appendChild(myTd).innerHTML = select_result[0][0];
}
Do a preview and make use of your browser’s developer tools to see the generated HTML:


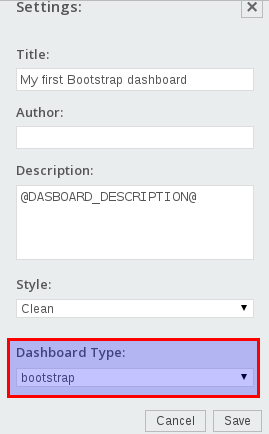
Choose bootstrap from the Dashboard Type pull down menu:
 Click Save.
Back to the Post Execution function of the Query Component: Now we want to make this a bit more dynamic: For every data row must be enclosed by <td> and within each data row each data value must be enclosed by <td>. We also have to add the <tbody> element to make a proper table. And we will apply the Bootstrap Striped Table design:
// Simple function preparing the table body

function() {
    var myContainer = document.getElementById('test');
    var myTable = document.createElement('table');
    var myTBody = document.createElement('tbody');
    var myTr = document.createElement('tr');
    var myTd = document.createElement('td');

    //myTable.id = 'table1';
    myTable.className = 'table table-striped';

    myContainer.appendChild(myTable).appendChild(myTBody);

    for(var i = 0; i < select_result.length; i++) {
        myContainer.lastChild.lastChild.appendChild(myTr.cloneNode());
        for(var j = 0; j < select_result[i].length; j++) {
            myText = document.createTextNode(select_result[i][j]);
            myContainer.lastChild.lastChild.lastChild.appendChild(myTd.cloneNode()).appendChild(myText);
        }
    }
}
You can find a text version of this JavaScript code a bit further down as well in case you want to copy it.

Note: In case you are creating this dashboard as part of a Sparkl plugin and you are having troubles seeing the bootstrap styles applied (and are sure that the problem is not within your code), try to preview the dashboard from within your Sparkl project endpoint listing (which seems to work better for some unknown reason):
One important thing missing is the header. Let’s source this info now. The Query Component provides following useful functions, which you can access within Post Execution function:
this.metadata
this.queryInfo
this.resultset
To get an idea of what is exactly available with in the metadata object, you can use in example this function:
document.getElementById('test').innerHTML = JSON.stringify(this.metadata);
Which reveals the following:

This is the function preparing the full table (header and body):
// function preparing the full table (header and body)

function() {

    var myContainer = document.getElementById('test');
    var myTable = document.createElement('table');
    var myTHead = document.createElement('thead');
    var myTh = document.createElement('th');
    var myTBody = document.createElement('tbody');
    var myTr = document.createElement('tr');
    var myTd = document.createElement('td');

    //myTable.id = 'table1';
    myTable.className = 'table table-striped';

    //document.getElementById('test').innerHTML = JSON.stringify(this.metadata);
    myMetadata = this.metadata;

    myContainer.appendChild(myTable).appendChild(myTHead).appendChild(myTr);

    for(var s = 0; s < myMetadata.length; s++){
        myHeaderText = document.createTextNode(myMetadata[s]['colName']);
        myContainer.lastChild.lastChild.lastChild.appendChild(myTh.cloneNode()).appendChild(myHeaderText);
    }

    myContainer.lastChild.appendChild(myTBody);

    for(var i = 0; i < select_result.length; i++) {
        myContainer.lastChild.lastChild.appendChild(myTr.cloneNode());
        for(var j = 0; j < select_result[i].length; j++) {
            myText = document.createTextNode(select_result[i][j]);
            myContainer.lastChild.lastChild.lastChild.appendChild(myTd.cloneNode()).appendChild(myText);
        }
    }

}

Voilá, our custom boostrap table is finished. This is not to say that you have to create a table this way in CDE: This was just an exercise to demonstrate a bit of the huge amount of flexibility that CDE offers. Take this as a starting point for something even better.


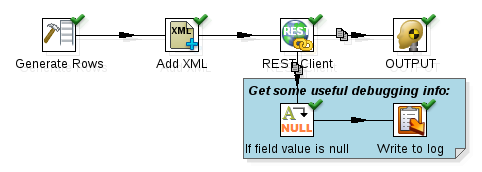
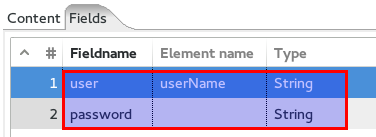
Field
|
Type
|
Value
|
url
|
String
|
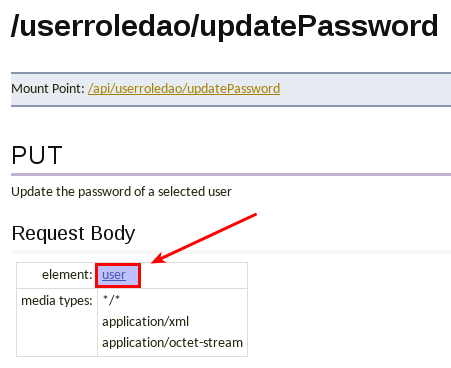
http://localhost:8080/pentaho/api/userroledao/updatePassword
|
user
|
String
|
your username
|
password
|
String
|
your password
|


Parameter
|
Description
|
cpk.plugin.id
|
the plugin ID
|
cpk.solution.system.dir
|
the pentaho solution system dir (full path)
|
cpk.plugin.dir
|
the plugin dir (full path)
|
cpk.plugin.system.dir
|
the plugin system dir (full path, this isn't used very often though and it might become deprecated)
|
cpk.webapp.dir
|
webapp dir (full path)
|
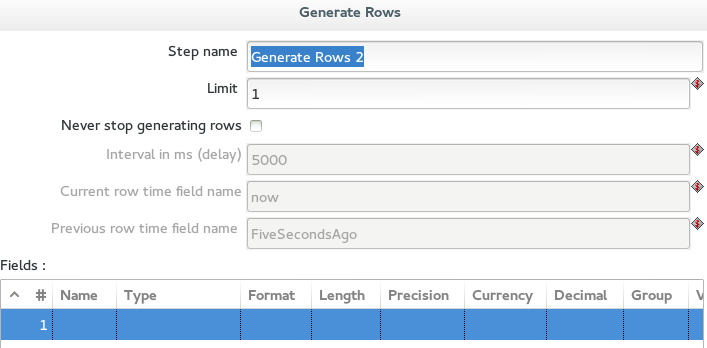
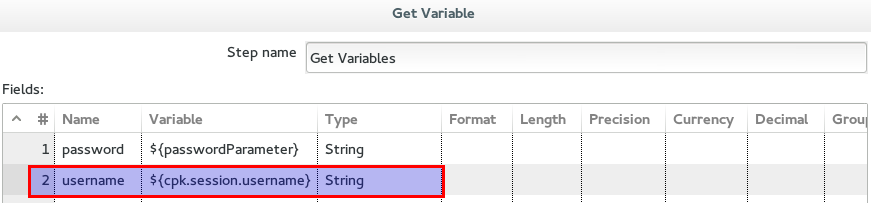
cpk.session.username
|
session username
|
cpk.session.roles
|
session roles (string with session authorities separated by commas)
|