Thursday, October 10, 2013

Understanding the Pentaho Kettle Dimension Insert/Update Step Null Value Behaviour

We will be using a very simple sample transformation to test the null value behaviour:

We use the Data Grid step to provide some sample data. We specified an id and name column and added data for one record. Let’s run the transformation and take a look at your dimension table in a query client:
Notice that Kettle automatically inserted an additional record with a technical key of value 0. This will only happen in the first execution. Below this record you find the one record from our sample dataset.


You can use the Dimension Lookup/Update step as well to perform only a lookup. Let’s test this. Double click on this step and untick Update the dimension?
Add one more data record to the Data Grid and then let’s perform a Preview on the Dimension Lookup/Update step:
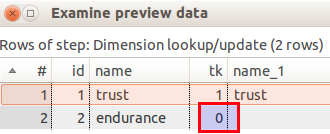
Notice how this new record got assigned a technical key of value 0. This is because the id 2 does not exist yet in the dimension table, hence the lookup returned a technical key of 0, the default for unknown values. Remember that every fact record must point to a dimensional record in a Kimball style star schema. The technical key of value 0 is making this possible.


Now let’s test what happens if we have a null value in the natural key in one of our dimension input records. Let’s add one more row to the test dataset:
Notice that we left the id empty for record #3.
Double click on the Dimension Lookup/Update step and enable the update functionality again:
Now run the transformation three times. After this, check the data in your dimensional table:
Hm, the record with the null natural key got inserted 3 times. Not so good!


So let’s quickly delete these records from the dimension table:
DELETE FROM dma.dim_scd2_test WHERE name = 'failure';


Let’s add a filter to our transformation so that these records do not make it to the Dimension Lookup/Update step. The filter checks if the id is not null:
Also create a copy of the Dimension Lookup/Update step. Double click on this copy and disable the update functionality; then connect it directly to the Data Grid step. We will use this copy only for previewing the lookup data.


Ok, now let’s run the transformation again several times and then analyze the data in the dimension table:
As you would have expected, this time we have a clean dimension dataset.


Now, let’s preview the data on the Dimension Lookup/Update step which has the update functionality disabled (so it will only perform a lookup):
Notice that our record with a null natural key got a 0 technical key assigned … just how it should be!


Long story short: Do not insert records with a natural key value of NULL into a dimension table!

Not just Null - handling different nuances


If you have special cases like “Empty”, “Not found” etc, you can manually add these entries to the dimension table (more info).


Let’s consider this for our test dataset. Let’s assume our imaginary client tells us that a natural key of -10000 means that no key is available. We want to track if there was really a -10000 key in the record or if it was null, so what we can do is add an additional record to the dimension manually:


INSERT INTO dma.dim_scd2_test VALUES (-1, 1,'1900-01-01 00:00:00'::timestamp,'2199-12-31 23:59:59'::timestamp,  -10000, 'no key available');


Please note that we set the version, date_from and date_to values as well!


The dimension data looks now like this:
Note: Depending on your DDL, you might not be able to insert a technical key of -1. In this case, just use a positive integer.


Ok, let’s add a new record to our test dataset:
Make sure you change the Filter condition so that it includes the -10000 case:
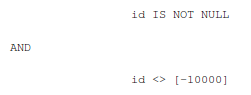
We don’t want any records with a natural key of -10000 to be inserted into the dimensional table by the Dimension Insert/Update step!


Let’s run the transformation and check the dimension dataset:
All good so far. Now let’s perform a Preview on the Dimension Lookup/Update step which has the update functionality disabled (so it will only perform a lookup):
As you can see, the correct technical keys got assigned.


I do hope that this article gave you a good overview on the null value behaviour of the Kettle Dimension Lookup/Update step. You can find the sample transformation discussed in this article here.

Tuesday, October 1, 2013

Going Agile: Pentaho Community Build Framework (CBF)

Going Agile: Pentaho Community Build Framework (CBF)

Info Sources

Why

CBF is an excellent tool to automate the build of your Pentaho BI/BA servers. Say you have various environments like dev, test, prod and you want an easy way of configuring and building your servers automatically, then CBF is for you.

Create basic folder structure

http://www.webdetails.pt/ctools/cbf.html provides a tar file with the basic structure. Download this file and extract it in a convenient location. Follow all the basic install instructions mentioned on this page.

Replace the build.xml file

Currently the quickstart package ships with an old version of the build.xml, which you have to replace:

cd cbf-quickstart
rm build.xml
wget --no-check-certificate https://raw.github.com/webdetails/cbf/master/build.xml

Setup project

Navigate inside the cbf-quickstart folder and rename the project-client folder to something more meaningful/project specific (by changing client to the real client or project name, i.e. project-puma).

Setup configs for different environments

To create configs for different environments, create build properties files for each of them:
project-*/config/build-*.properties

In example:
project-puma/config/build-dev.properties
project-puma/config/build-test.properties
project-puma/config/build-prod.properties

You can use the existing build.properties as a template. For now you will not have many properties in these files, once we start working on the patches, we will be able to added many more properties to these files.

Provide patch files

Patch files are all those files that you want CBF to replace in the original generic source packages. This can be completely static files (in example PDR jar library) but more importantly all these config files etc for which you want to have different settings on the various environments. You can copy these files in to the respective folders (solution for pentaho-solution and target-dist/server for all the Tomcat or JBoss related config files (by retaining the original folder structure). Once copied there, you can make these files’ content dynamic by adding tokens (syntax: @token@) for the config settings that you want to define.

Example web.xml (which is already part of the cbf-qickstart package):

This file was put into following folder:  
project-*/patches/target-dist/server/webapps/pentaho/WEB-INF/web.xml

As you can see, we retain the full folder structure for the web.xml.

Example of a token you could set in this file:
       <context-param>
               <param-name>solution-path</param-name>
               <param-value>@solution.deploy.path@</param-value>
       </context-param>

The value for this token is set in project-*/config/build-*.properties:
solution.deploy.path = ../../solution/

If required, you can add other files and tokenize them in similar fashion.

Where do you get these files from you wonder? Simply build the BI server once without any special settings are download a compiled version of it (i.e. from sourceforge.net).

Examples of relevant files that you want to have various versions of depending on the environment (as said these are example, your milage may vary):

Solution:

biserver-ce/pentaho-solutions/system/publisher.xml
biserver-ce/pentaho-solutions/system/olap/datasources.xml

biserver-ce/pentaho-solutions/system/applicationContext-spring-security-jdbc.xml

biserver-ce/pentaho-solutions/system/applicationContext-spring-security-hibernate.properties
biserver-ce/pentaho-solutions/system/hibernate/hibernate-settings.xml
biserver-ce/pentaho-solutions/system/hibernate/mysql5.hibernate.cfg.xml
biserver-ce/pentaho-solutions/system/hibernate/oracle10g.hibernate.cfg.xml
biserver-ce/pentaho-solutions/system/hibernate/postgresql.hibernate.cfg.xml

biserver-ce/pentaho-solutions/system/mondrian/mondrian.properties
biserver-ce/pentaho-solutions/system/olap/datasources.xml

biserver-ce/pentaho-solutions/system/quartz/quartz.properties

biserver-ce/pentaho-solutions/system/sessionStartupActions.xml

If required, you can remove all the startup actions from this last file. The beans part will then look like this:

<beans>
   <bean id="sessionStartupActionsList" class="java.util.ArrayList">
       <constructor-arg>
           <list>
           </list>
       </constructor-arg>
   </bean>
</beans>


Web Server:

Type
Original folder/file
CBF folder/file
web.xml
/tomcat/webapps/pentaho/WEB-INF/web.xml
target-dist/server/webapps/pentaho/WEB-INF/web.xml
JDBC Drivers
tomcat/lib
target-dist/server/lib
JDNI Database connections: Add resource entry for each connection you want to define
tomcat/webapps/pentaho/META-INF/context.xml
target-dist/server/webapps/pentaho/META-INF/context.xml

Providing different files for each environment (optional)

In the standard setup only one patch folder exists:
project-client/patches

This should be fine as long as you don’t need specific versions of static files in the various environments. In example, you might want to test the latest stable version of the PRD library on the test environment whereas your production environment is still on the previous version.

Pro-tip by Pedro Alves:

I'd leave the current patches dir as is but add another feature:

project-client/patches-${extraPatchesDir}

That way, on your cbf config file you could have:

useExtraPatchesDir = true
extraPatchesDir = dev (or whatever)

and you'd add the patch files to that dir. Then CBF would apply the standard patches first and then the extraPatches.

DS: So this would translate in following folder structure in example:
project-puma/patches-dev
project-puma/patches-test
project-puma/patches-prod

Get Pentaho BI Server source code

Within the top level CBF folder create a folder for storing the required version of the Pentaho BI server:

cd cbf-quickstart
mkdir pentaho-4.8
svn co http://source.pentaho.org/svnroot/bi-platform-v2/tags/4.8.0-stable/ ./pentaho-4.8

Add Ctools

There is no separate installation necessary. Andrea Torre kindly added support to the CBF ant file to install C* Tools (see this blog post).
In the build-*.properties file you can specify if ctools should be installed after the cbf build and you can specify which branch you want to use (defaults to stable):
ctools.install = true
ctools.branch = dev
Alternatively, if you require some specific parameters of the c-tools installer which are not covered by the ant script (in example currently you cannot specify specific components), you will have to run the c-tools-installer yourself, in example:
rm -rf ctools
mkdir -p ctools/system
./ctools-installer.sh -b stable -c cdf,cda,cde,cgg, cdb,saiku,saikuadhoc -s ctools -y -n

Later on you can write a custom shell script to install these files automatically into the target-dist/solution.

Installing Tomcat

You can install Tomcat anywhere on your system, it doesn’t have to reside in the cbf-quickstart folder. To reference your Tomcat installation, add (example):
tomcat.path = /usr/share/tomcat
to project-*/config/build-*.properties

If you have not Tomcat installed yet, go to the Tomcat Version 6 Download Page and choose the Binary Distribution > Core > Zip or tar.gz.

Once the file is downloaded, navigate to the cbf-quickstart directory and run:
cp ~/Downloads/apache-tomcat-6.0.37.zip .
unzip apache-tomcat-6.0.37.zip

In this case, you should reference Tomcat like this in the project-*/config/build-*.properties:
tomcat.path = ../../apache-tomcat-6.0.37

Finish configuring CBF

The build.properties file located in project-*/config holds all the essential settings for your project. As mentioned before, you can also create specific build properties files for each environment, which inherits from the main build.properties file (properties in build-*.properties override those in build.properties). Make sure you finished configuring all the properties now!

vi project-*/config/build-*.properties

tomcat.path = /usr/share/tomcat
pentaho.dir = pentaho-4.8
solution.path = project-client/solution/
#Example of a token:
solution.deploy.path = ../../solution/

Build

Now it is time to run the Ant build:
ant -Dproject=<project-name> -Denv=<environment-name> dist-clean all

Replace <project-name> and <environment-name> with the respective real world names.

Remember: the <project-name> has to be the same as to define for the project folder (in example: project-puma). <environment-name> has to be from one of the build properties files that you created (i.e. one we used here is build-dev.properties). Following our example, this would be:
ant -Dproject=puma -Denv=dev dist-clean all

Target (Build) Options

(This section is mostly copied from the CBF website for completeness sake)
See all available target options:
$ ant -Dproject=<project-name> -Denv=<environment-name> -p

Doing a full compile
When we want to "start from scratch", with a clean system, this is the command to use:

$ ant -Dproject=<project-name> -Denv=<environment-name> dist-clean all

Start the project after compiled
This will simply start tomcat

$ ant -Dproject=<project-name> -Denv=<environment-name> run

Full compile and start server
You can guess this one:

$ ant -Dproject=<project-name> -Denv=<environment-name> dist-clean all run

Deploy to a remote server, solutions only
$ ant -Dproject=<project-name> -Denv=<environment-name> dist-clean deploy-solutions

Apply the patches only without a full compile
No need to do the dist-clean here.

$ ant -Dproject=<project-name> -Denv=<environment-name> copy-init run

Full deploy to a remote server
This will transfer both server and solutions.

$ ant -Dproject=<project-name> -Denv=<environment-name> dist-clean deploy-all
Ctools build targets (source):
ctools-installer: Install ctools (prompts for modules)
ctools-installer-auto: Install ctools silently
ant -Dproject=<project-name> -Denv=<environment-name> ctools-installer

Fixing Build Errors

Blacklisted class javax.servlet.Servlet found

If you get an error message like this one:
BUILD FAILED
/opt/pentaho/cbf/cbf-quickstart/build.xml:374: The following error occurred while executing this line:
/opt/pentaho/cbf/cbf-quickstart/target-build/bi-platform-assembly/build-res/assembly_shared.xml:19: !!! Blacklisted class javax.servlet.Servlet found in a retrieved jar.  Assembly cannot proceed !!!

Solution:

mkdir -p project-client/patches/target-build/bi-platform-assembly/build-res

cp pentaho-4.8/bi-platform-assembly/build-res/assembly_shared.xml project-client/patches/target-build/bi-platform-assembly/build-res

Copy the contents of the assembly_shared.xml in there and add following argument:
<available property="Servlet.class.present" classname="javax.servlet.Servlet" ignoresystemclasses="true">

Deploying to the various environments

CBF offers 2 methods of deploying the build (fully configured BI server) or only the solution to the various servers (i.e. test, prod). One of them is rsync - see for CBF details. CBF comes with a feature to build RPMs (see here).

Register Plugins once server started

Without registering the plugins you might get following error message when opening a report:

ERROR [GenericServlet] GenericServlet.ERROR_0004 - Resource /reporting/reportviewer/cdf/cdf-module.js not found in plugin reporting


In the following order:
  1. Refresh solution repository
  2. Refresh the plugin adapter
  3. Refresh system settings

Recommended folder structure with Git

Why git? Version control - enough said - it should be part of every project. Read this excellent blog post by Pedro Alves (CBF and Versioning - How to develop Pentaho solutions in a team)

Usually you will have one git repo per client project. Inside the project folder create a folder called cbf and add a .gitignore file with following content (this setup was kindly suggested by Paul Stoellberger):
target-dist/*
target-build/*
apache*
pentaho-*
solution/*

Once you ran the shell script - which we will talk about in a second (see next section) - you will have following files and folders inside your cbf folder:

folder name
description
in git
apache-tomcat
tomcat web server
N
biserver-ce-4.8
Holds the biserver source code
N
data
Holds the sql files to create the Pentaho repository DB and quartz DB (excludes any hypersonic shell scripts). This folder was copied over from a BI server installation downloaded from sourceforge.net
N (although, on one occasion I had to add a bug fix in which case I put it on git)
project-*
project specific folders
Y
scripts
This folder holds custom created start and stop scripts for the BI server (not part of CBF)
Y
build-client-dev.sh
This is a custom created shell script which further automated the build for a specific project (and environment)
Y
build.xml
Ant build xml, part of CBF
N

Further automate the build using a shell file


Please find below a sample of a custom created build-*-*.sh file. This example was kindly provided by Paul Stoellberger:

#!/bin/sh

## Custom script - created by Paul - not included in original CBF

# if not done - check out pentaho 4.8
if [ -d "pentaho-4.8" ]
then
  echo "Found pentaho-4.8"
else
   echo "Checking out pentaho-4.8 sources...."
   svn checkout svn://source.pentaho.org/svnroot/bi-platform-v2/branches/4.8/ pentaho-4.8
fi

# svn checkout svn://source.pentaho.org/svnroot/bi-platform-v2/branches/4.8/ pentaho-4.8


# do we have a tomcat?
if [ -d "apache-tomcat" ]
then
  echo "Found tomcat"
else
   echo "Downloading tomcat....."
   wget http://tweedo.com/mirror/apache/tomcat/tomcat-6/v6.0.37/bin/apache-tomcat-6.0.37.tar.gz
   tar -xf apache-tomcat-6.0.37.tar.gz
   mv apache-tomcat-6.0.37 apache-tomcat
   rm apache*.gz
fi


rm -rf ctools-installer.sh

rm -rf solution
mkdir solution

# build the package
ant -Dproject=aaa -Denv=dev dist-clean all


# custom c-tools installation
wget https://raw.github.com/pmalves/ctools-installer/master/ctools-installer.sh
mkdir solution/system
sh ctools-installer.sh -b stable -s solution/ -c cdf,cda,cde,cgg,saiku,saikuadhoc -y -n

# copy over our solution and patches
cp -r ../pentaho-solutions/* solution/

# copy over sql scripts to create repository, hibernate and quartz (added by DS)
cp -R data target-dist
cp scripts/* target-dist/

# copy over solution folder
mv solution/ target-dist/solution/

chmod +x target-dist/*.sh
chmod +x target-dist/server/bin/*.sh

# copy over sql scripts to create repository, hibarnate and quartz (added by DS)
cp -r data target-dist

# cleanup
# we dont need the kettle plugins - way too big
rm -rf target-dist/solution/system/kettle/plugins/*
rm -rf target-dist/solution/system/BIRT
rm -rf target-dist/licenses

# package it all up into tar.gz
#mkdir dist
#tar zcf aaa-package.tar.gz -C target-dist .
#mv aaa-package.tar.gz dist/

BI server runtime errors

For some unknown reason my CBF build was not quite cheering up with c-tools. Basically when I opened CDE I could see the interface, but parts of it were not functional and I got following error message (logs/catalina.out):
12:19:31,928 ERROR [DashboardDesignerContentGenerator] Could not get component definitions: null
12:19:31,928 ERROR [DashboardDesignerContentGenerator] getcomponentdefinitions: null
java.lang.NullPointerException
at pt.webdetails.cdf.dd.util.Utils.getRelativePath(Utils.java:216)
at pt.webdetails.cdf.dd.util.Utils.getRelativePath(Utils.java:182)
at pt.webdetails.cdf.dd.model.meta.reader.cdexml.fs.XmlFsPluginModelReader.readBaseComponents(XmlFsPluginModelReader.java:228)
at pt.webdetails.cdf.dd.model.meta.reader.cdexml.fs.XmlFsPluginModelReader.read(XmlFsPluginModelReader.java:148)
at pt.webdetails.cdf.dd.model.meta.reader.cdexml.fs.XmlFsPluginModelReader.read(XmlFsPluginModelReader.java:120)
at pt.webdetails.cdf.dd.model.meta.reader.cdexml.fs.XmlFsPluginModelReader.read(XmlFsPluginModelReader.java:43)

I could see the solution repository in PUC and PRD reports were just working fine.
Unfortunately nobody else seemed to have run into this problem, so there was no info available on how to fix this. After several trial and errors I pinned the problem down to the relative solution path I had configured in the web.xml. I just replaced this one with an absolute path and everthing was working fine then in CDE.


I'd like to say special thanks to Paul Stoellberger and Pedro Alves for sharing some of their ideas with me on this particular topic and everyone involved in CBF for their hard work!