We will be using a very simple sample transformation to test the null value behaviour:

We use the Data Grid step to provide some sample data. We specified an id and name column and added data for one record. Let’s run the transformation and take a look at your dimension table in a query client:

Notice that Kettle automatically inserted an additional record with a technical key of value 0. This will only happen in the first execution. Below this record you find the one record from our sample dataset.
You can use the Dimension Lookup/Update step as well to perform only a lookup. Let’s test this. Double click on this step and untick Update the dimension?

Add one more data record to the Data Grid and then let’s perform a Preview on the Dimension Lookup/Update step:
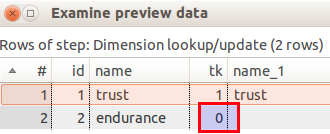
Notice how this new record got assigned a technical key of value 0. This is because the id 2 does not exist yet in the dimension table, hence the lookup returned a technical key of 0, the default for unknown values. Remember that every fact record must point to a dimensional record in a Kimball style star schema. The technical key of value 0 is making this possible.
Now let’s test what happens if we have a null value in the natural key in one of our dimension input records. Let’s add one more row to the test dataset:

Notice that we left the id empty for record #3.
Double click on the Dimension Lookup/Update step and enable the update functionality again:

Now run the transformation three times. After this, check the data in your dimensional table:

Hm, the record with the null natural key got inserted 3 times. Not so good!
So let’s quickly delete these records from the dimension table:
DELETE FROM dma.dim_scd2_test WHERE name = 'failure';
Let’s add a filter to our transformation so that these records do not make it to the Dimension Lookup/Update step. The filter checks if the id is not null:

Also create a copy of the Dimension Lookup/Update step. Double click on this copy and disable the update functionality; then connect it directly to the Data Grid step. We will use this copy only for previewing the lookup data.
Ok, now let’s run the transformation again several times and then analyze the data in the dimension table:

As you would have expected, this time we have a clean dimension dataset.
Now, let’s preview the data on the Dimension Lookup/Update step which has the update functionality disabled (so it will only perform a lookup):

Notice that our record with a null natural key got a 0 technical key assigned … just how it should be!
Long story short: Do not insert records with a natural key value of NULL into a dimension table!
Not just Null - handling different nuances
If you have special cases like “Empty”, “Not found” etc, you can manually add these entries to the dimension table (more info).
Let’s consider this for our test dataset. Let’s assume our imaginary client tells us that a natural key of -10000 means that no key is available. We want to track if there was really a -10000 key in the record or if it was null, so what we can do is add an additional record to the dimension manually:
INSERT INTO dma.dim_scd2_test VALUES (-1, 1,'1900-01-01 00:00:00'::timestamp,'2199-12-31 23:59:59'::timestamp, -10000, 'no key available');
Please note that we set the version, date_from and date_to values as well!
The dimension data looks now like this:

Note: Depending on your DDL, you might not be able to insert a technical key of -1. In this case, just use a positive integer.
Ok, let’s add a new record to our test dataset:

Make sure you change the Filter condition so that it includes the -10000 case:
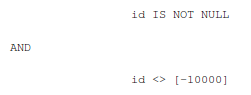
We don’t want any records with a natural key of -10000 to be inserted into the dimensional table by the Dimension Insert/Update step!
Let’s run the transformation and check the dimension dataset:

All good so far. Now let’s perform a Preview on the Dimension Lookup/Update step which has the update functionality disabled (so it will only perform a lookup):

As you can see, the correct technical keys got assigned.
I do hope that this article gave you a good overview on the null value behaviour of the Kettle Dimension Lookup/Update step. You can find the sample transformation discussed in this article here.


