Quite inspired by the recent interesting webinar by Harris Ward (@hazamonzo) of Ivy Information Systems I prepared this short write-down of the core principles of using the Bootstrap framework with Pentaho CDE (which in essence summarize the main points of the webinar). I take that you are familiar with CDE, so I will not go into details on how to install it or on how to create a dashboard. This article only focuses on using Bootstrap with CDE.
Why Bootstrap
For a long time Blueprint had been the default framework for CDE. While it worked nicely on the desktop, the content didn’t quite adjusted as nicely to tablets and mobile phones.
As of recently CDE supports the Bootstrap framework. The good news is that you can apply Bootstrap to the selector components like buttons, drop down menus etc as well, hence pathing the way to a uniform look of your dashboard!
How to use it with CDE
Configure your CDE Dashboard to use Bootstrap
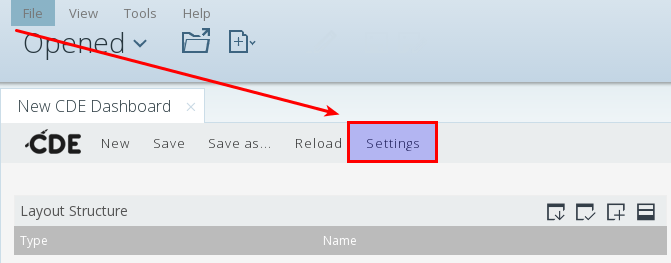
The very first thing to do is define the settings for your dashboard. In CDE click on the Settings button in the main menu:
In the settings screen provide a Name and then set the Dashboard Type to Bootstrap:
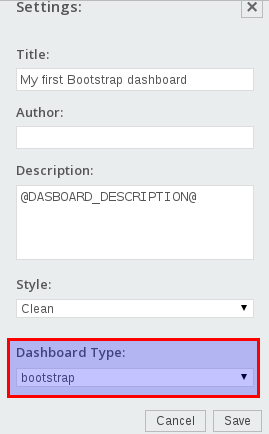
Click Save.
Generate your standard layout
Next generate your Layout Structure as usual, just keep the following in mind:
- With Bootstrap, the total span size of the page is 12 columns (as opposed to Blueprint, which has 24 columns). This means that if your page has only one column, the span size should be 12. If your page has 2 columns, the span size should be 6 for each of them and so on (calc: 12 / no of cde columns).
- Within each column nest an HTML element: This one will hold the Bootstrap HTML snippet. In the most simple form it will look like this:
Make sure to provide a name for the HTML object in the Properties panel (otherwise, the styles do not show up properly in the preview - at least in my case this happened).
Get code from Bootstrap website
The Bootstrap website offers a wealth of components. These ones can be found by click in the main menu on either CSS or Components. Use the side panel menu to get detailed info about each component: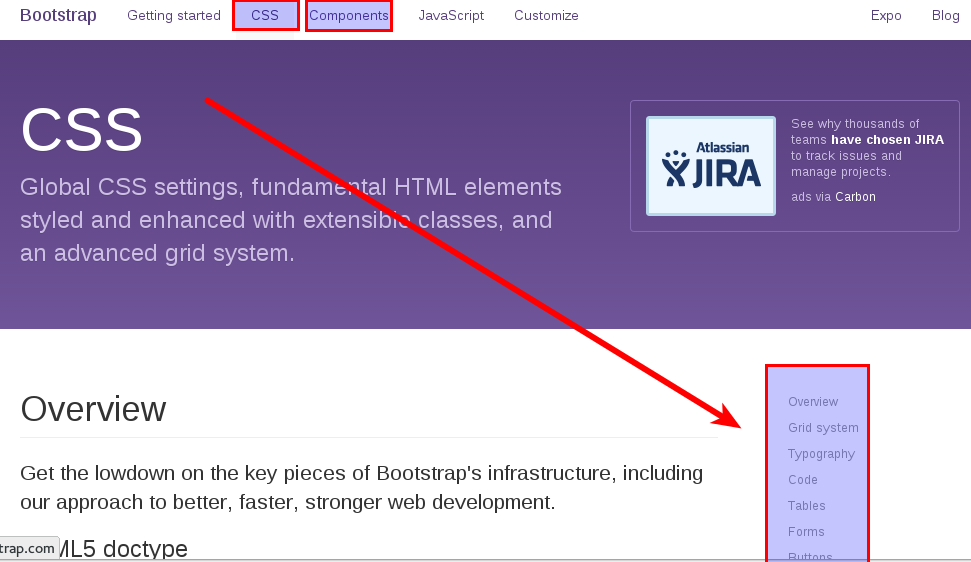
One component which you will most likely use is called Penals [reference]. Again, there is a wide choice of panels available, let’s take a look at the Penal with header: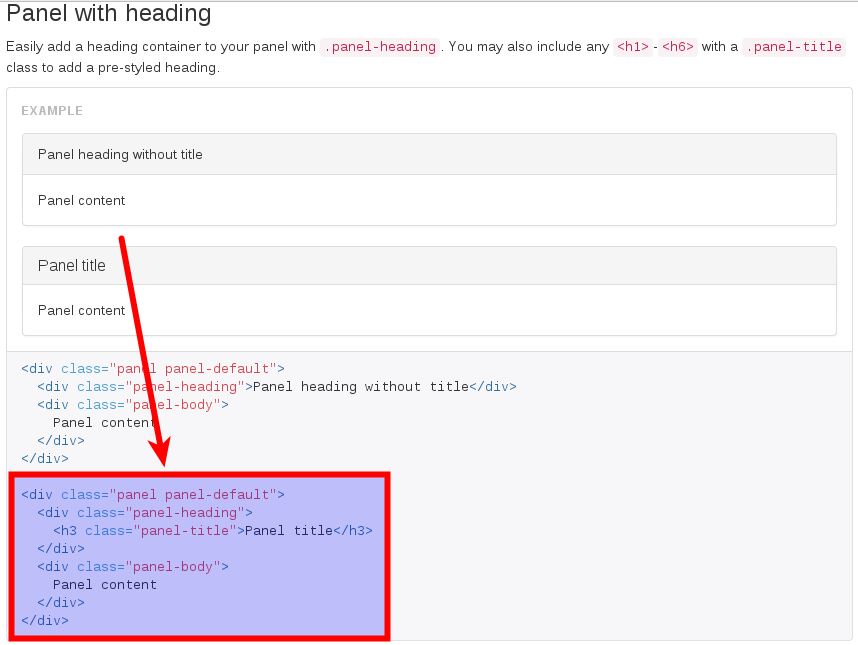
Copy the last main div section - this is the one we want to base our layout on.
Amend Bootstrap HTML
You can use for example JSFiddle to simply amend the Bootstrap HTML snippet and get a preview of it.
- Copy the Bootstrap HTML snippet into the HTML panel
- Copy this reference into the CSS panel: @import url('http://getbootstrap.com/dist/css/bootstrap.css')
- Adjust the HTML. Do at least the following:
- Provide a proper title.
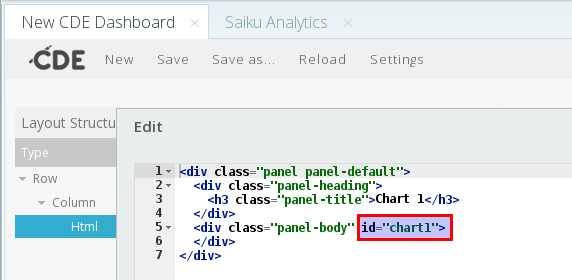
- Add an id attribute to the content div. This way we can later on reference it when we want to assign a chart component.
- Delete the default content text.
- Then click the Run button to get a preview:
We are happy with the preview, so let’s copy the HTML code.
Add amended Bootstrap HTML to CDE Layout Structure
When we initially created the Layout Structure in CDE, we nested an HTML element inside each column - just copy bootstrap HTML there. Choose the HTML element in the Layout Structure panel, then click on the HTML ellipsis [...] button in the Properties panel:

Finally paste the Bootstrap HTML snippet:

Click OK.
Save the dashboard now and do a preview:

Our Bootstrap panel is nicely rendered within the CDE dashboard now. It’s time to add some content!
Create your data sources
Business as usual - nothing special to consider. Just create your datasources as you would do it for any other dashboard.
Create your components
Overall business as usual, just keep in mind that you do not want to reference the HTML object the old way (so based on the elements you defined in the Layout Structure), but instead make use of the div ids defined within the Bootstrap HTML snippets (that you saved within the HTML element in the Layout Structure).
So for this article I quickly created a CCCBarChart component. The important bit about it is that I specified chart1 for the HTMLObject property:
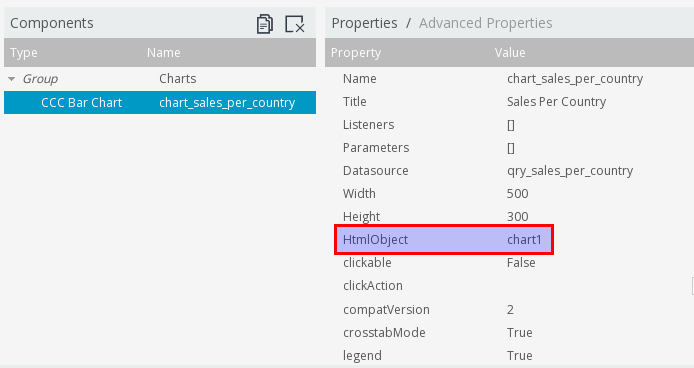
Note that this ties back to the div id attribute we defined in our Bootstrap HTML snippet [stored in the Layout Structure HTML element]:
So let’s do another preview:

So that is it: It turns out using Bootstrap with Pentaho CDE is actually fairly easy. This example was certainly extremely simple and only meant to give you a brief introduction.
Last Example
Let’s add a button:
- Adjust the Layout Structure of your dashboard to make room for a button.
- Let’s copy the HTML snippet for the standard button. Jump over to JSFiddle and adjust it until you are happy with the preview. Remember to add a dedicated id attribute.
- Copy the HTML snippet again and paste it into the HTML properties field of your HTML element in the Layout Structure panel.
- Save and Preview your dashboard.
Again, a very easy example. I guess now you are certainly interested in creating some more challenging dashboards with Pentaho CDE and Bootstrap!
And finally, a big thanks to Harris for providing this excellent webinar!